Tiny Sparks WA Radio Interview with 6PR Perth

The call out for sewing and knitting volunteers has achieved a phenomenal response from the community, with our original Facebook post reaching viral status of near 200,000 person reach!

Radio station 6PR 882AM generously joined in to help our call out reach even more people, speaking with board member Michelle Giles on Easter Monday morning about this worthy cause.

To listen to the interview, please click here.

Can't sew or knit? There are other ways to assist with our NICU Care Packages or other programmes, follow the highlighted links or email admin@tinysparkswa.org.au to find out more!


Knitting Pattern for NICU Beanies

Thankyou for considering knitting for our community.

The pictured beanies were knitted using 3.25mm needles and 4 ply 50% cotton 50% acrylic wool and therefore the pattern and overall sizing reflects this. Use of different sized needles will most likely result in a slight difference in overall size. Should you wish to use a slightly varied pattern, or crochet a beanie, the required overall size of these beanie when lying flat (completed and sewn) is approx 9.5cm wide at the base and 9.5cm tall (fits up to approx 1.2kg). You are welcome to experiment with any colours you like!

We also have a more limited need for larger pre-term (2kg-2.5kg) and small newborn (2.5-3.0kg) sized beanies. Knitted or crochet beanies of your own design would be gratefully accepted. (Note: the reason for the gap in sizing between the very small beanies detailed below and the larger sizes required, is that babies in between these two stages are often placed on CPAP, a form of breathing assistance, which covers the babies head and prevents them from wearing a beanie.)  

Completed beanies can be posted to: Tiny Sparks WA, PO Box 1114, West Leederville WA 6901. If you have any questions you many contact us at admin@tinysparkswa.org.au. Thank you very much to those volunteers who are able to assist!


Girls' Beanie

The girls' beanie pattern contains a chevron style pattern, as pictured to the right. 

Ribbing Step (6 rows)

  1. Cast 56 stitches.
  2. Alternating Knit 1, Purl 1 for 6 rows.

Chevron Pattern (16 rows)

  1. Purl 1 stitch, Knit 3 stitches and repeat for rows 1, 5, 9 and 13.
  2. Knit 1 stitch, Purl 5 stitches, Knit 1, Purl 1, and repeat for rows 2, 6, 10 and 14.
  3. Knit 2 stitches, Purl 1, Knit 3, Purl 1, Knit 1, and repeat for rows 3, 7, 11 and 15.
  4. Purl 2 stitches, Knit 1, Purl 1, Knit 1, Purl 3, and repeat for rows 4, 8, 12 and 16.

Shaping Crown (10 rows)

  1. Knit 6 stitches, then Knit 2 stitches together (i.e. drop one stitch), repeat.
  2. Purl stitch entire row.
  3. Knit 5 stitches, then Knit 2 stitches together, repeat.
  4. Purl stitch entire row.
  5. Knit 4 stitches, then Knit 2 stitches together, repeat.
  6. Purl stitch entire row.
  7. Knit 3 stitches, then Knit 2 stitches together, repeat.
  8. Purl stitch entire row.
  9. Knit 2 stitches, then Knit 2 stitches together, repeat.
  10. Purl stitch entire row.

Completing

  1. Cut yarn leaving sufficient length to sew beanie together with.
  2. Thread end of yarn through remaining stitches on needle.
  3. Draw tightly and fasten off securely.
  4. Sew up edges to form beanie.

Boys' Pattern

The boys' beanie pattern is plainer than the girls' beanie pattern, without the chevron pattern. It is pictured on the right with a coloured stripe however the patten below is for a single coloured beanie and does not detail switching yarn; however you are welcome to do this if you wish.

Ribbing Step (6 rows)

  1. Cast on 56 stitches.
  2. Alternating Knit 2 stitches, Purl 2 stitches for 6 rows.

Main Body (16 rows)

  1. Knit one row.
  2. Purl one row.
  3. Repeat, alternating.

Shaping Crown (10 rows)

  1. Knit 6 stitches, then Knit 2 stitches together (i.e. drop one stitch), repeat.
  2. Purl stitch entire row.
  3. Knit 5 stitches, then Knit 2 stitches together, repeat.
  4. Purl stitch entire row.
  5. Knit 4 stitches, then Knit 2 stitches together, repeat.
  6. Purl stitch entire row.
  7. Knit 3 stitches, then Knit 2 stitches together, repeat.
  8. Purl stitch entire row.
  9. Knit 2 stitches, then Knit 2 stitches together, repeat.
  10. Purl stitch entire row.

Completing

  1. Cut yarn leaving sufficient length to sew beanie together with.
  2. Thread end of yarn through remaining stitches on needle.
  3. Draw tightly and fasten off securely.
  4. Sew up edges to form beanie.

Sewing Volunteers needed for NICU outfits

Whilst clothing is available in the Neonatal Unit for parents to dress their babies in, the outfit included within the Tiny Sparks WA Neonatal Care Package is the parents to keep and does not go back in to the communal clothing pool. The feedback we have received about these outfits is exceptionally positive, including from one parent who framed both of the outfits she received for her twin boys once they had been discharged; they become a treasured keepsake and a reminder of just how small their babies once were.

These outfits have distinct girls and boys designs, are lined and include press-stud backs and shoulders for Neonatal Unit compatibility. The outfits are sized to fit up to approximately 1.2kg and 'up to 1.6kg'.

We are pleased to include below the directions for making both of these outfits. If you would like to have a go at creating some of these precious outfits to donate to Tiny Sparks WA for inclusion in our Neonatal Care Packages, we would be very grateful! You may use any reasonably light weight cotton fabric you wish, and you may send the finished item with or without press-studs, Tiny Sparks WA are happy to attach the press-studs with our specialty equipment. 

Knitted beanies are also welcome, but donations of outfits without beanies is perfectly acceptable, these items do not necessarily need to come as pairs. [Update 2 April 2015: The knitting pattern for these beanies is available here]

Finished outfits (and/or beanies) can be sent to: Tiny Sparks WA, PO Box 1114, West Leederville WA 6901, Australia.

A list of answers to FAQs can be found at our knitting and sewing page.

Girls' NICU Outfit

The pattern for the Girls' NICU outfit can be downloaded from the knitting and sewing page here The pattern is available in 1.2kg and 1.6kg sizes.

Material should be light weight cotton and pre-washed. Depending on the materials pattern and your placement, you will need approx 22cm x 45cm of each lining and outer fabric for the 1.2kg outfits (i.e. a 'fat quarter' of each lining and outer fabrics should make two outfits) and a slightly larger piece for the 1.6kg size.

The pattern is designed to be printed at 100% scale on an A4 piece of paper. There is a small square which should measure 1cm x 1cm when printed to ensure the patten is the correct size (9.5mm - 10.5mm is acceptable).

Step 1

Cut 1 x outer material and 1 x lining material out of FOLDED fabric, with folded edge placed where pattern indicates. The unfolded product is shown in Step 2.

3 - Cut on Fold.jpg

Step 2

Sew the lining and the outer fabrics together with the correct (end product presentation) sides together (i.e. the reverse sides of the fabric should be facing outwards); the pattern is inclusive of a 6mm seam allowance. Ensure an opening is left for turning the garment inside out.

4 - Sew right sides together.jpg

Step 3

Turn the sewn together dress inside out to reveal the correct outer side of the final product.

5 - Turn in right side.jpg

Step 4

Hand sew the gap that was left for turning the dress inside out - you're done!!

Tiny Sparks WA will attach the press-studs and package the dress ready for distribution to a NICU family. If you have the appropriate equipment to attach studs and sockets (they are not sewn but attached by a pressing machine), please click here for more details on stud type and placement.

2 - NICU Dress.jpg

Boys' NICU Outfit

The pattern for the boys' NICU outfit can be found here The pattern is available in 1.2kg and 1.6kg sizes.

Material should be light weight cotton and pre-washed. Depending on the materials pattern and your placement, you will need approx 22cm x 45cm of each lining and outer fabric for the 1.2kg outfits (i.e. a 'fat quarter' of each lining and outer fabrics should make two outfits) and a slightly larger piece for the 1.6kg size.

The pattern is designed to be printed at 100% scale on an A4 piece of paper. There is a small square which should measure 1cm x 1cm when printed to ensure the patten is the correct size (9.5mm - 10.5mm is acceptable).

Step 1

Cut 7 pieces in total as indicated on the pattern. 1 x front in outer material, 1 x front in lining material, 2 x back pieces in outer materials, 2 x back pieces in lining material, 1 x pocket in contrast material (lining or other).

The front patterns are cut along a fold then unfolded to create 1 larger piece (i.e. there is no seam on the front of the outfit). The back patterns are placed away from the folded edge to create the 2 individual back pieces.

3 - Cut.jpg

Step 2

Sew the pocket (cut from lining or other material contrasting to the outer fabric) on to the front outer piece.

4 - Sew pocket.jpg

Step 3

Sew the two back pieces of outer fabric to either side of the front piece of outer fabric. Then repeat this step for the lining fabrics. The 6mm seam allowance is inclusive in the pattern.

5 - Sew side seams.jpg

Step 4

Sew the lining and the outer fabrics together with the correct (end product presentation) sides together (i.e. the reverse sides of the fabric should be facing outwards); the pattern is inclusive of a 6mm seam allowance. Ensure an opening is left for turning the garment inside out.

6 - Sew together.jpg

Step 5

Turn the sewn together outfit inside out to reveal the correct outer side of the final product.

7 - Turn press.jpg

Step 6

Hand sew the gap that was left for turning the outfit inside out - you're done!!

Tiny Sparks WA will attach the press-studs and package the dress ready for distribution to a NICU family. If you have the appropriate equipment to attach studs and sockets (they are not sewn but attached by a pressing machine), please click here for more details on stud type and placement.

2 - NCIU Shirt.jpg

Volunteers

We greatly appreciate any assistance and welcome all donations from keen volunteer sewers! Finished outfits can be sent to: Tiny Sparks WA, PO Box 1114, West Leederville WA 6901.

If you would like to be kept up to date with volunteering opportunities with Tiny Sparks WA, including sewing opportunities, please contact admin@tinysparkswa.org.au or complete the volunteering form here.

Parent Tips - Breastfeeding in the Neonatal Unit

We asked parents on our Facebook community to share tips to help mums currently in the neonatal unit breastfeeding their baby:

"Dont be hard on yourself. A wonderful midwife said "Be kind to yourself" I am still in the unit as my baby is 26 week preemie not 35 weeks. I couldn't breastfeed and I was devasted but wonderful guidence from the team made it easier.Nakia S

"For my bub and I breastfeeding was the best experience. My son was born at 23+3 weeks so I pumped away for a long time (he was tube fed obviously, no bottles except either the Medela Calma teat) and around 37 weeks gestation we started skin to skin and having him near the nipple. He would be so tired trying to suck so we ended up trying a nipple shield and that helped immensely. (I phased out the nipple shield a few months after we were sent home) I was there for 4 breastfeeds a day (other 4 were bottle feeds) in the last 2 weeks but the day we got out of the hospital after a 4 month stay I just put bub to breast. No bottles. Fed on demand which was every 40 minutes but that built my supply and comforted him. I had great support in the NICU and SCN from nurses and the LC's and read many books to educate myself. We breastfed for over 3 years." Lisa R

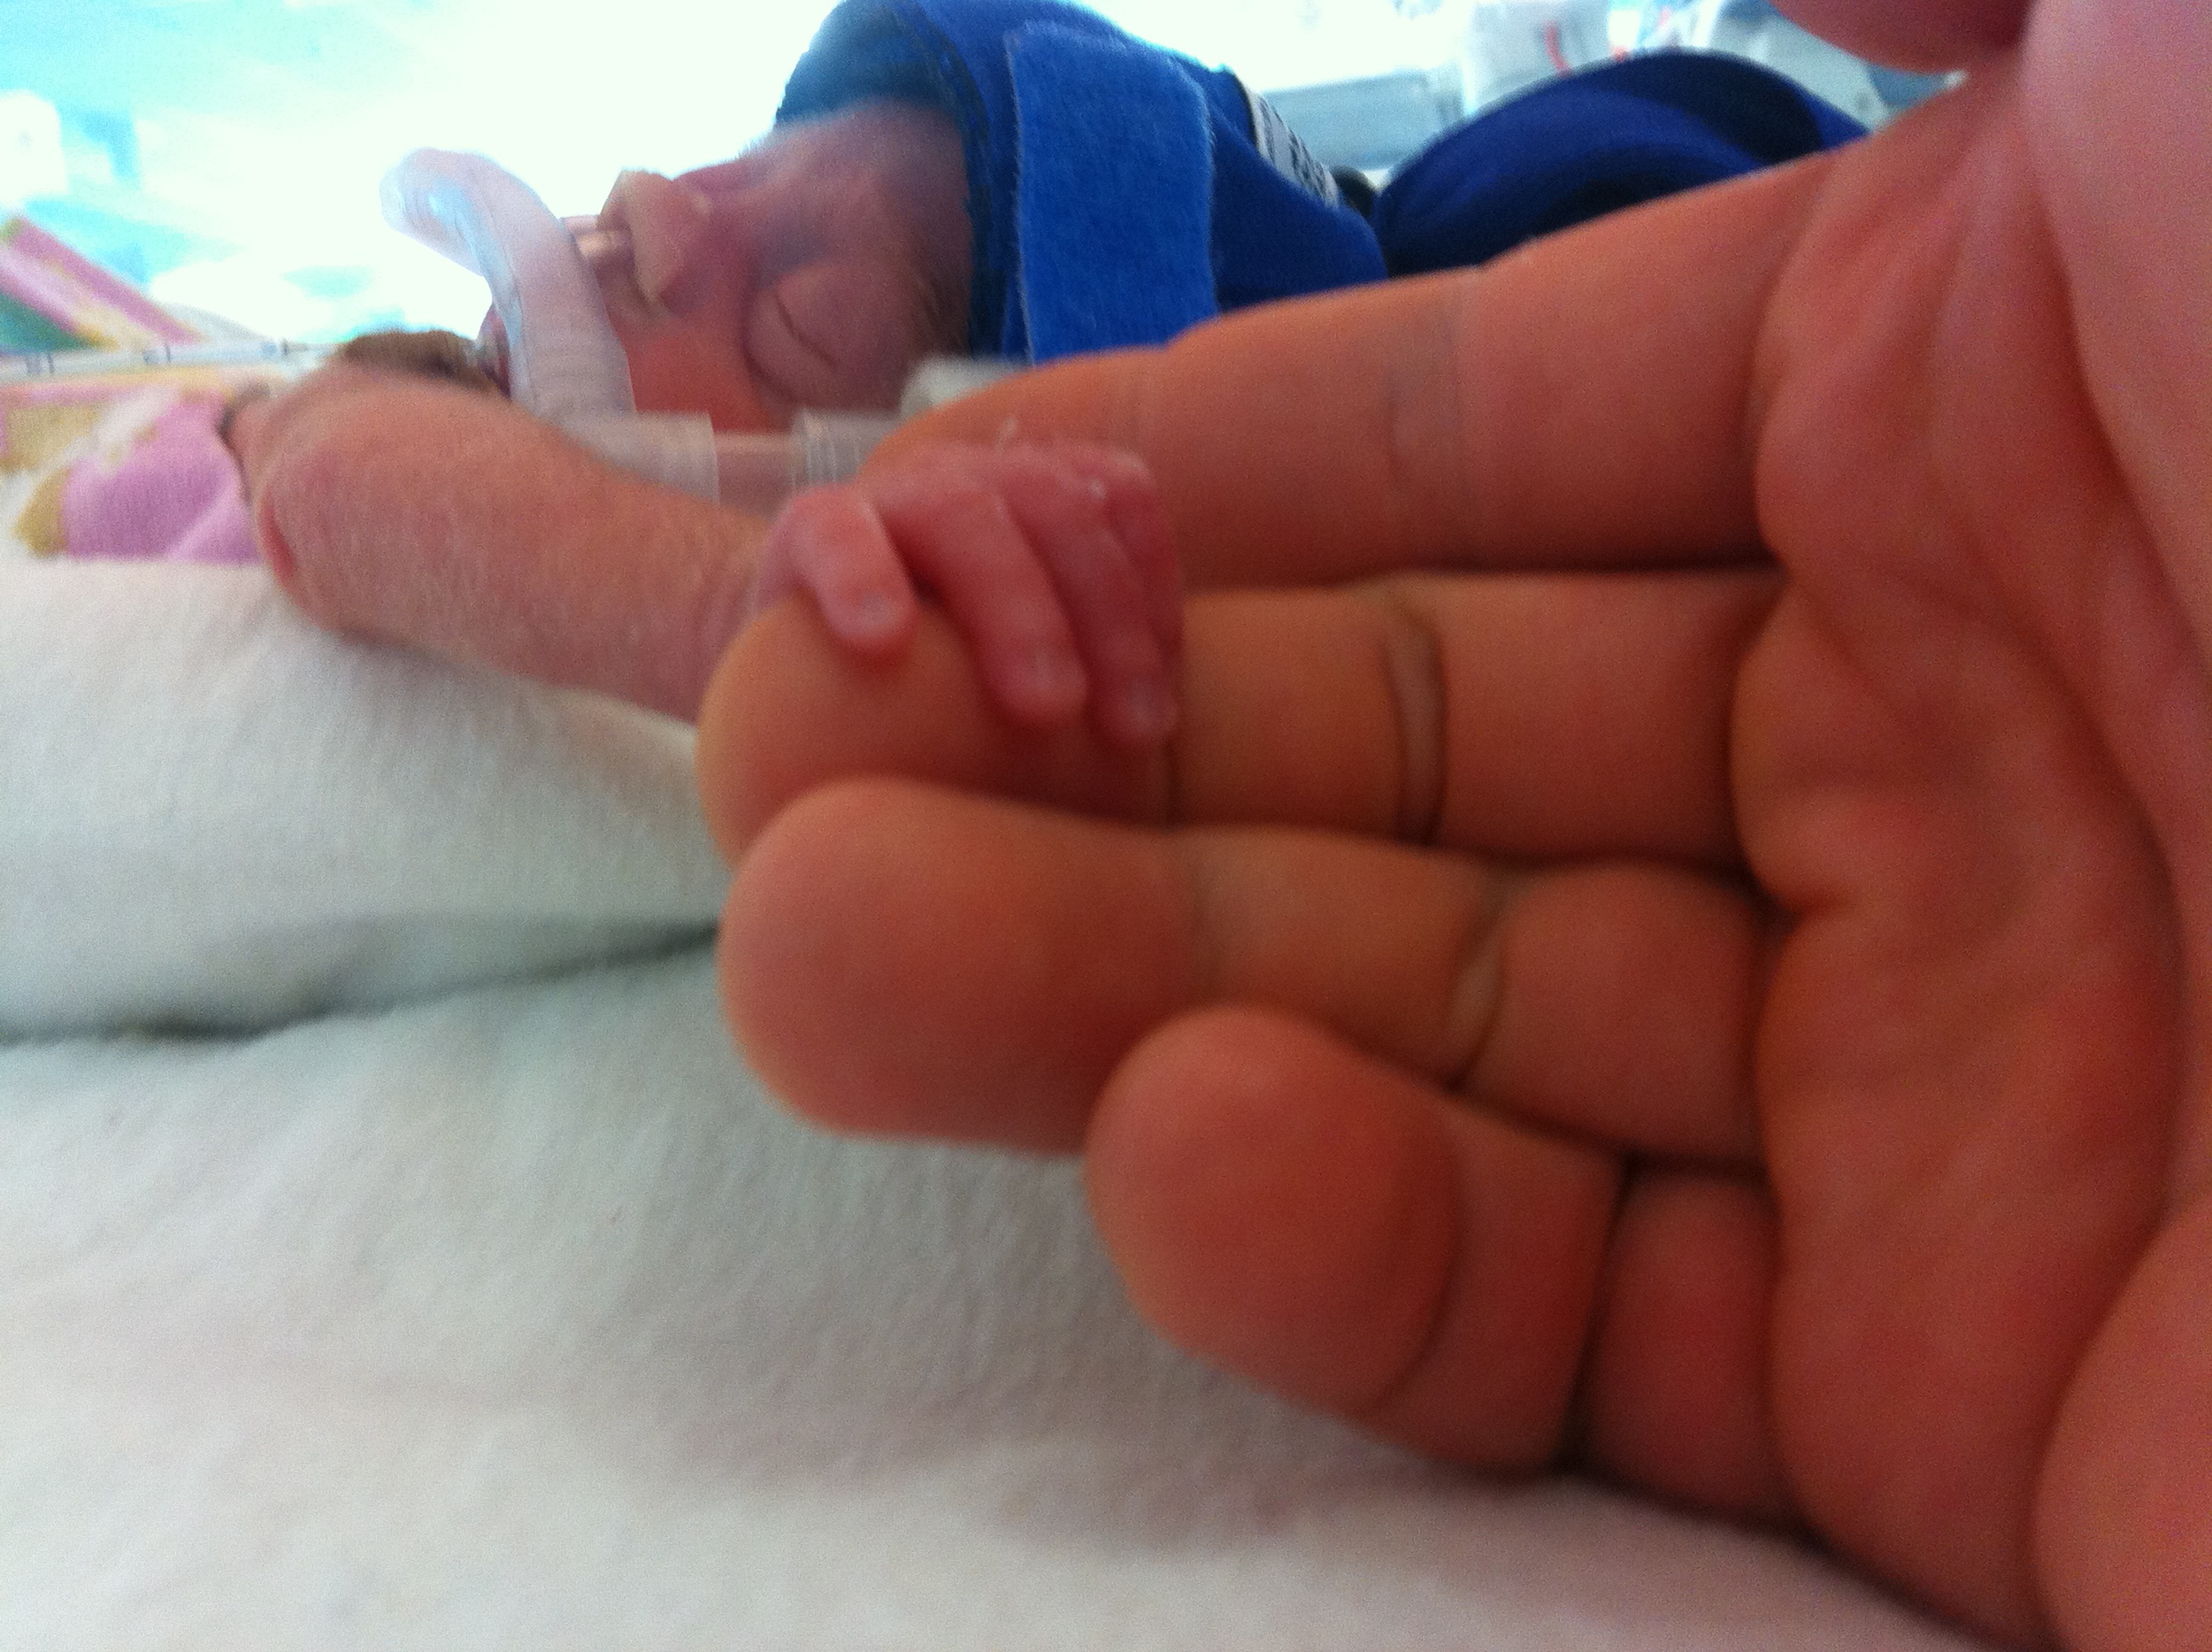
"Be kind to yourself and seek support from the lactation consultants. I found pumping beside my 28week daughter in the NICU good. When we first tried breastfeeding she would get tired very quickly and would require being tube fed at the end of the feed but she eventually got stronger and by the time she came home after 3 months she was fully breastfed. I did find that I would need to feed her quite regularly at first as she would still tire quicker but she eventually got stronger and I was able to feed her until she was 18months." Michelle C

"My daughter was born so soon after I went into preterm labour, I did not realise how important it was to breastfeed. She was born on a Monday evening, the next morning a midwife showed me how to pump, a few drops came out but that was all. I was too upset to even think about pumping after that, until my husband read somewhere that breast milk was one of the few things we could do for her. So I started trying to pump every 3 hours round the clock 2 days after she was born. I started with 6-7mls, then 20-30mls. After 3 weeks, I was getting 350mls a day, I eventually built up to 500-550mls a day after 4-5 weeks. So don't despair, if you start out slow, just keep going and trying. I started breastfeeding around the 33-34 week mark, while my daughter was still on CPAP. She latched on quite well but tired out easily. I would try to breastfeed her at least 3-4 times a day while still in hospital. She came home fully breastfed and I fed her until she was 16mths actual, 13mths corrected. I even had a scare 8 weeks after she came home, she was sick and not feeding much, so my supply dropped dramatically, but again I kept at it, topped her up with the frozen milk I had and my supply returned after 2 weeks." Sharon L

"I had a my son at 27 weeks. Had a very difficult time expressing. Was doing everything I could to boost milk supply. Motillium, made my own lactation cookies. I managed to do this for 6 months and kept in mind I can only do what I can and any bit of my milk helps him. Unfortunately he lost his battle in Oct but I know I gave it everything I could under very difficult circumstances. I am proud of how long I lasted." Simone BK

"I had my twin boys at 27 +1, i was extremely stressed & worried about their health & my milk supply was so low, i tried everything to increase my supply, expressing next to them, expressing with my baby on my chest, lactation cookies, medication from the doctor, it was so depressing seeing mums walk in with their full milk containers. i expressed all day & night for 8 weeks but would only get less than 100ml a day, i felt a lot of pressure from the nurses to keep expressing & i would be asked twice a day by each of the boys nurses how my milk is going & have i tried this & that. My advice is give it a go but don't beat yourself up if you can't, i really wanted to breastfeed my babies but it just wasn't happening for me." Katie O

"My twin boys were born at 27w 3d gestation and due to capacity issues transferred to another hospital's NICU and along with them went my colostrum. I arrived there two days later, breast pump equipment in hand. I too pumped every three hours around the clock by their incubators, and when the alarms became too much, moved to the expressing room. The lactation consultant on board was informative but maybe I think this as I was one of the fortunate ones whose milk supply was 'good'. I'm not sure if I'd have felt the same if it wasn't. The pressure I found to supply breast milk not only coming from my inner voice but all around was huge. I know mums that were trying so hard and producing very little despite their efforts. I don't know if I would have been as motivated especially with all the stress associated with being in NICU. In terms of tips and things that I think could have been communicated better, it's a transition process made up of a number of phases. Expect to experience an adjustment period perhaps difficulty as you move from one to the other. 
Phase 1; the first 20 expressions; colostrum
Phase 2; build milk supply
Phase 3, breast contact
Phase 4; suck feeds
Phase 5; build suck feeds 
Phase 6; full breast or express or both?  
Phase 7: transition to alternatives (note phase 7 may precede any of the previous phases at any time)
My boys are almost ten months old (almost 7 months corrected). Somehow we navigated all the bumps so that they were both fully breastfeed until one became ill and was readmitted into hospital, we then went to my frozen supply and expressed breast milk. When demand became greater than supply, we held our breaths and moved to mixed feeds at three months corrected. Still pumping and now facing the next challenge, move to solids. 
And the quick sum, ask for support, forgive and be kind to yourself. You did great already." Sonya G


2015 Quiz Night Wrap

Our Inaugural Quiz Night was a resounding success with 134 guests raising a fantastic $5,538!

Quiz Night underway at the South Perth Community Hall

Quiz Night underway at the South Perth Community Hall

First prize was won by the Perth & Districts Multiple Birth Association Committee table after winning a three way tie with the question "How many decimals of Pi do you know". They took home over $3,000 worth of Penfolds wine, Verve Portraits photography packages and LotteryWest scratchies. 

Paper Planes game...serious stuff!

Paper Planes game...serious stuff!

Games of heads and tails, true and false, paper planes and an extra quiz sheet were hotly contested with winners walking away with a Bunnings gift voucher, Penfolds wine, AQWA family pass, movie tickets and red rooster vouchers.

A fantastic 16 care packages were donated on the night, with donors loving the opportunity to write a personal message on a card to be gifted directly to a family in need. Guests were quick to buy raffle tickets for both the chocolate/coffee/champagne raffle and the baby goods raffle.

Rebecca sharing her high-risk pregnancy and NICU experience

Rebecca sharing her high-risk pregnancy and NICU experience

Mum Rebecca generously shared her story of her high-risk pregnancy and NICU journey with her daughter Amelia. Her words and the beautiful video she made touched many hearts. You can see the video below.

A big thanks to Brett Campany for being our Quiz Master extraordinaire and doing great job keeping our guests entertained. Thanks also to Sarah Smith and her team of Mark, Karen and Jane coordinating and working the bar for us.

Thank you very much to the following people and organisations for donating prizes and raffle items:

We hope to see you all again at our 2016 Quiz Night!